Client-side telemetry: Lambda permissions and APIs in CDK
Adding permissions and an API Gateway to an existing Lambda with CDK.

Graeme Zinck
Feb 11, 2025
Senior software engineer at Lazer Technologies
5 min read
This is the 4th article in a 5-part series:
Rolling your own client-side telemetry solution using AWS CDK
A step-by-step walkthrough on deploying a client-side telemetry stack using AWS CDK, Lambda, API Gateway, and CloudWatch.
- Client-side telemetry: Series overview
- Client-side telemetry: Setting up a new CDK project
- Client-side telemetry: Deploying a Typescript Lambda function with CDK
- Client-side telemetry: Lambda permissions and APIs in CDK
- Client-side telemetry: Alarms
So, you have a lambda function all set up with CDK and you got it deployed successfully. The downsides right now:
- You don't have sufficient AWS permissions inside the lambda yet.
- You can't access the lambda from the internet.
- You don't know when new errors get sent to the logs.
We're going to address the first two in this article!
Adding permissions to the Lambda
Permissions should be easy, right? CDK knows you're running a lambda, so it should add all the necessary permissions...?
Not so fast. CDK is smart enough to add the basic execution permissions, but it doesn't know what other permissions you need. For security reasons (and probably others), you need to specify those explicitly.
In our case, we're missing the permissions to put logs and metrics into CloudWatch. We can do that with 🥁🥁🥁 another construct!
We'll start off with a basic role with no extras. This is similar to the default role CDK automatically assigned our lambda.
// lib/constructs/LambdaRole.ts
import * as iam from "aws-cdk-lib/aws-iam";
import { Construct } from "constructs";

interface LambdaRoleProps {
  readonly serviceName: string;
  readonly environment: string;
  readonly region: string;
}

export class LambdaRole extends Construct {
  public readonly role: iam.Role;

  constructor(scope: Construct, id: string, props: LambdaRoleProps) {
    super(scope, id);

    this.role = new iam.Role(this, "Role", {
      assumedBy: new iam.ServicePrincipal("lambda.amazonaws.com"),
      roleName: `ecs-${props.serviceName}-${props.region}-${props.environment}-lambda-role`,
      managedPolicies: [
        iam.ManagedPolicy.fromAwsManagedPolicyName(
          "service-role/AWSLambdaBasicExecutionRole",
        ),
      ],
      // More policies will go here!
    });
  }
}
If you're wondering why the roleName is so long, it's because IAM roles are
global and must be unique across all regions in the account. If we wanted to
deploy our stack in multiple regions with the same service and environment,
npx cdk deploy would fail due to the naming conflict.
Next up, we need to add the custom permissions to the role.
The rule of thumb is that you should only add the minimum permissions necessary, and we do that by specifying the exact resources and actions we need (i.e., avoiding wildcards). The exception is for CloudWatch metrics since they don't have ARNs. In this case, we have to use a wildcard.
// lib/constructs/LambdaRole.ts
// ...
// interface LambdaRoleProps {
//   readonly serviceName: string;
//   readonly environment: string;
//   readonly region: string;
     readonly logGroupName: string;
// }

// export class LambdaRole extends Construct {
//   ...
//   constructor(scope: Construct, id: string, props: LambdaRoleProps) {
//     super(scope, id);

       const policyName = `${props.serviceName}-${props.region}-${props.environment}-lambda-policy`;

// .   this.role = new iam.Role(this, 'Role', {
//       assumedBy: new iam.ServicePrincipal('lambda.amazonaws.com'),
//       roleName: `ecs-${props.serviceName}-${props.region}-${props.environment}-lambda-role`,
//       managedPolicies: [
//         iam.ManagedPolicy.fromAwsManagedPolicyName(
//           'service-role/AWSLambdaBasicExecutionRole'
//         ),
//       ],
         inlinePolicies: {
           [policyName]: new iam.PolicyDocument({
             statements: [
               new iam.PolicyStatement({
                 actions: ['cloudwatch:PutMetricData'],
                 resources: ['*'],
               }),
               new iam.PolicyStatement({
                 actions: ['logs:PutLogEvents'],
                 resources: [
                   `arn:aws:logs:${props.region}:902625158466:log-group:${props.logGroupName}:log-stream:*`,
                 ],
               }),
             ],
           }),
         },
//     });
//   }
// }
Now we just need to add this to the Api.ts construct.
// lib/constructs/Api.ts
// ...
   import { LambdaRole } from './LambdaRole';
// ...
// interface ApiProps {
      region: string;
//    environment: string;
//    serviceName: string;
//    metricNamespace: string;
//    logGroupName: string;
//    logStreamName: string;
// }
// export class Api extends Construct {
//   public readonly api: apigateway.IRestApi;
//   public readonly errorLoggerFn: lambda.IFunction;
//
//   constructor(scope: Construct, id: string, props: ApiProps) {
//     super(scope, id);

       const lambdaRole = new LambdaRole(this, 'LambdaRole', {
         ...props,
       });

//     this.errorLoggerFn = new lambda.Function(this, 'ErrorLoggerFunction', {
         role: lambdaRole.role,
//       ...
//     });
//   }
// }
One last thing: we need to add the region parameter when we instantiate this!
// lib/infra-fe-telemetry-stack.ts
// ...
// export class InfraFETelemetryStack extends cdk.Stack {
//   constructor(
//     ...
//   ) {
//     ...
//     new Api(this, 'Api', {
         region: this.region,
//       environment,
//       serviceName,
//       metricNamespace,
//       logGroupName,
//       logStreamName: LOG_STREAM_NAME,
//     });
//   }
// }
Now, we have all our permissions set up and we can deploy our stack!
npx cdk deployAdding API Gateway
Next, we'll add an API Gateway so that we can accept requests from the internet. Fortunately, CDK provides a bunch of helpers to make it easy to link a Lambda to an API Gateway!
The snippet below makes it possible to make a POST request to the /error
endpoint. It also adds a CORS preflight method to the endpoint so that apps can
make requests from the internet.
// lib/constructs/Api.ts
// ...
// export class Api extends Construct {
     public readonly api: apigateway.IRestApi;
//   public readonly errorLoggerFn: lambda.IFunction;

//   constructor(scope: Construct, id: string, props: ApiProps) {
//     ...
       this.api = new apigateway.LambdaRestApi(this, 'Api', {
         restApiName: `${props.serviceName}-${props.environment}-api`,
         description: 'API Gateway for the frontend telemetry service',
         handler: this.errorLoggerFn,
         proxy: false,
       });

       // Define '/error' resource with a POST method
       const errorLoggerResource = this.api.root.addResource('error');
       errorLoggerResource.addMethod('POST');

       // Define OPTIONS method for CORS
       errorLoggerResource.addCorsPreflight({
         allowOrigins: apigateway.Cors.ALL_ORIGINS,
         allowMethods: apigateway.Cors.ALL_METHODS,
         allowHeaders: apigateway.Cors.DEFAULT_HEADERS,
       });
//   }
// }
Now, we have an API, but we can't access it yet.
Setting up DNS
As mentioned earlier in the series, we're assuming
you have a domain set up with AWS Route 53.
All we need to do is set up the DNS records to point
https://fe-telemetry.{local|staging|production}.{your-domain}.com to the API
Gateway.
We'll set this up in a separate construct. We won't dive into the specifics of how DNS works here, but the main steps involve:
- Getting the
HostedZonefor your existing domain - Getting a certificate for HTTPS
- Setting up an API Gateway domain name
- Adding a DNS record to map the domain to API Gateway
// lib/constructs/Dns.ts
import { Construct } from "constructs";
import * as route53 from "aws-cdk-lib/aws-route53";
import * as targets from "aws-cdk-lib/aws-route53-targets";
import * as apigateway from "aws-cdk-lib/aws-apigateway";
import * as certificatemanager from "aws-cdk-lib/aws-certificatemanager";

interface DnsProps {
  domainName: string;
  subdomain: string;
  api: apigateway.IRestApi;
}

export class Dns extends Construct {
  public readonly zone: route53.IHostedZone;
  public readonly certificate: certificatemanager.ICertificate;
  public readonly domain: apigateway.IDomainName;
  public readonly records: route53.IRecordSet[];

  constructor(scope: Construct, id: string, props: DnsProps) {
    super(scope, id);

    // Get the existing hosted zone in route 53 (must be set up separately)
    this.zone = route53.HostedZone.fromLookup(this, "HostedZone", {
      domainName: `${props.domainName}.`,
    });

    // To support HTTPS, we need a certificate
    this.certificate = new certificatemanager.Certificate(this, "Certificate", {
      domainName: `${props.subdomain}.${props.domainName}`,
      validation: certificatemanager.CertificateValidation.fromDns(this.zone),
    });

    // Set up an API Gateway domain name
    this.domain = new apigateway.DomainName(this, "DomainName", {
      domainName: `${props.subdomain}.${props.domainName}`,
      certificate: this.certificate,
      endpointType: apigateway.EndpointType.REGIONAL,
    });

    // Add a DNS record to map the domain to API Gateway
    this.records = [
      new route53.RecordSet(this, "FeTelemetryRecord", {
        recordType: route53.RecordType.A,
        target: route53.RecordTarget.fromAlias(
          new targets.ApiGatewayDomain(this.domain),
        ),
        zone: this.zone,
        recordName: `${props.subdomain}.${props.domainName}.`,
      }),
    ];

    new apigateway.BasePathMapping(this, "BasePathMapping", {
      domainName: this.domain,
      restApi: props.api,
    });
  }
}
Now, we just need to add the parameters to the Api.ts construct...
// lib/constructs/Api.ts
   import { Dns } from './Dns';
// ...
// interface ApiProps {
//   ...
     domainName: string;
     subdomain: string;
// }

// export class Api extends Construct {
//   public readonly api: apigateway.IRestApi;
//   public readonly errorLoggerFn: lambda.IFunction;
     public readonly dns: Dns;

//   constructor(scope: Construct, id: string, props: ApiProps) {
//     ...
       this.dns = new Dns(this, 'Dns', {
         domainName: props.domainName,
         subdomain: props.subdomain,
         api: this.api,
       });
//   }
// }
...and pass the arguments to it!
// lib/infra-fe-telemetry-stack.ts
// ...
// export class InfraFETelemetryStack extends cdk.Stack {
//   constructor(
//     ...
//   ) {
//     ...
//     new Api(this, 'Api', {
//       ...
         domainName,
         subdomain,
//     });
//   }
// }
Time to deploy and see if it works! Note that this will take a while because the certificates take time to issue.
npx cdk deployTesting the service
To test it out, send a POST request to the /error endpoint using the request
from the first article in this series:
curl -X POST 'https://fe-telemetry.{local|staging|production}.{your-domain}.com/error' \
  -H "Content-Type: application/json" \
  -d '{
    "severity": 2,
    "errorCode": "UNCAUGHT_ERROR",
    "device": "iPhone 15",
    "os": "iOS 17.2",
    "appVersion": "1.0.0",
    "error": "Some error message"
  }'
It should return something like this:
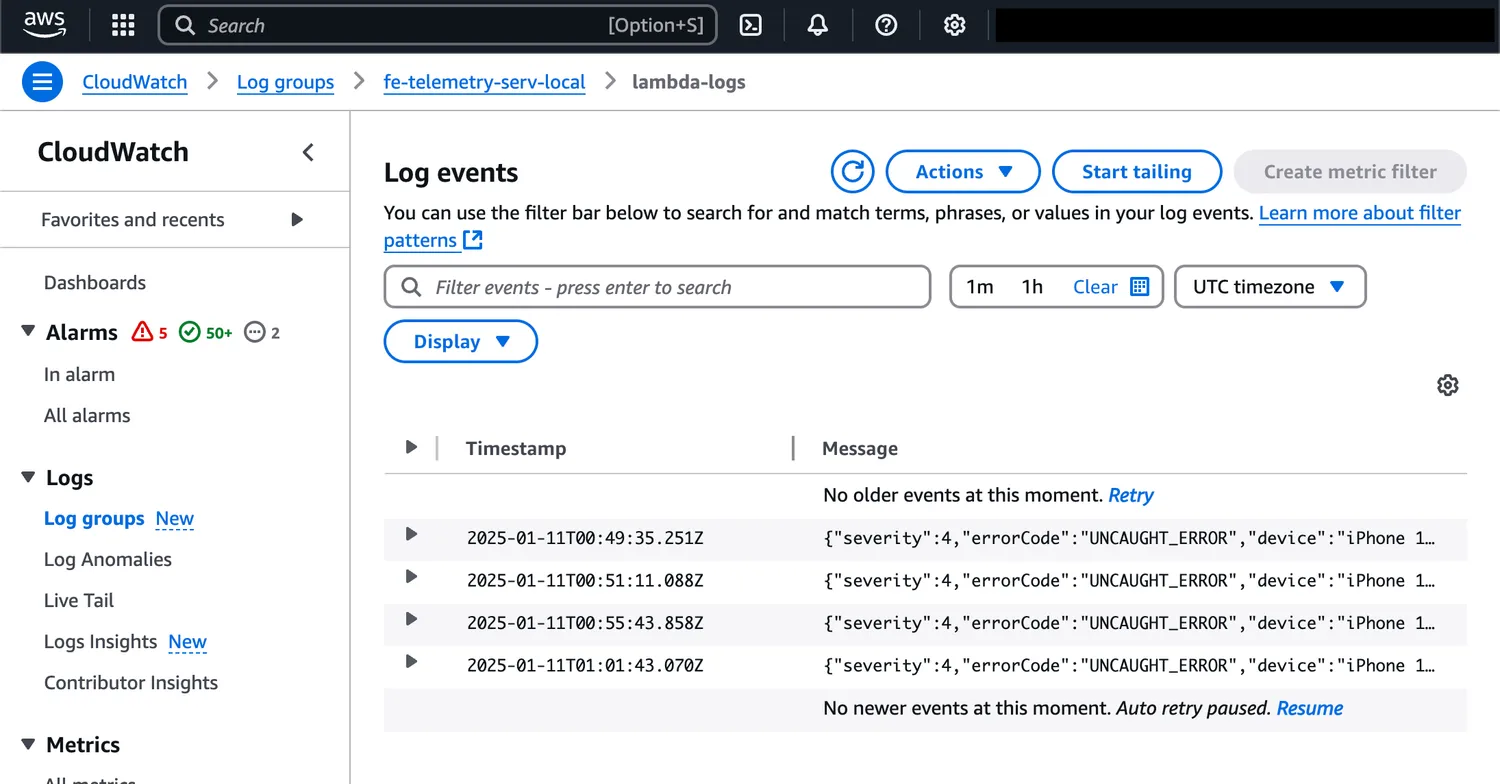
{ "message": "Error logged successfully" }You can now log into CloudWatch and see the error in the logs!
You can also see the metrics in CloudWatch Metrics.
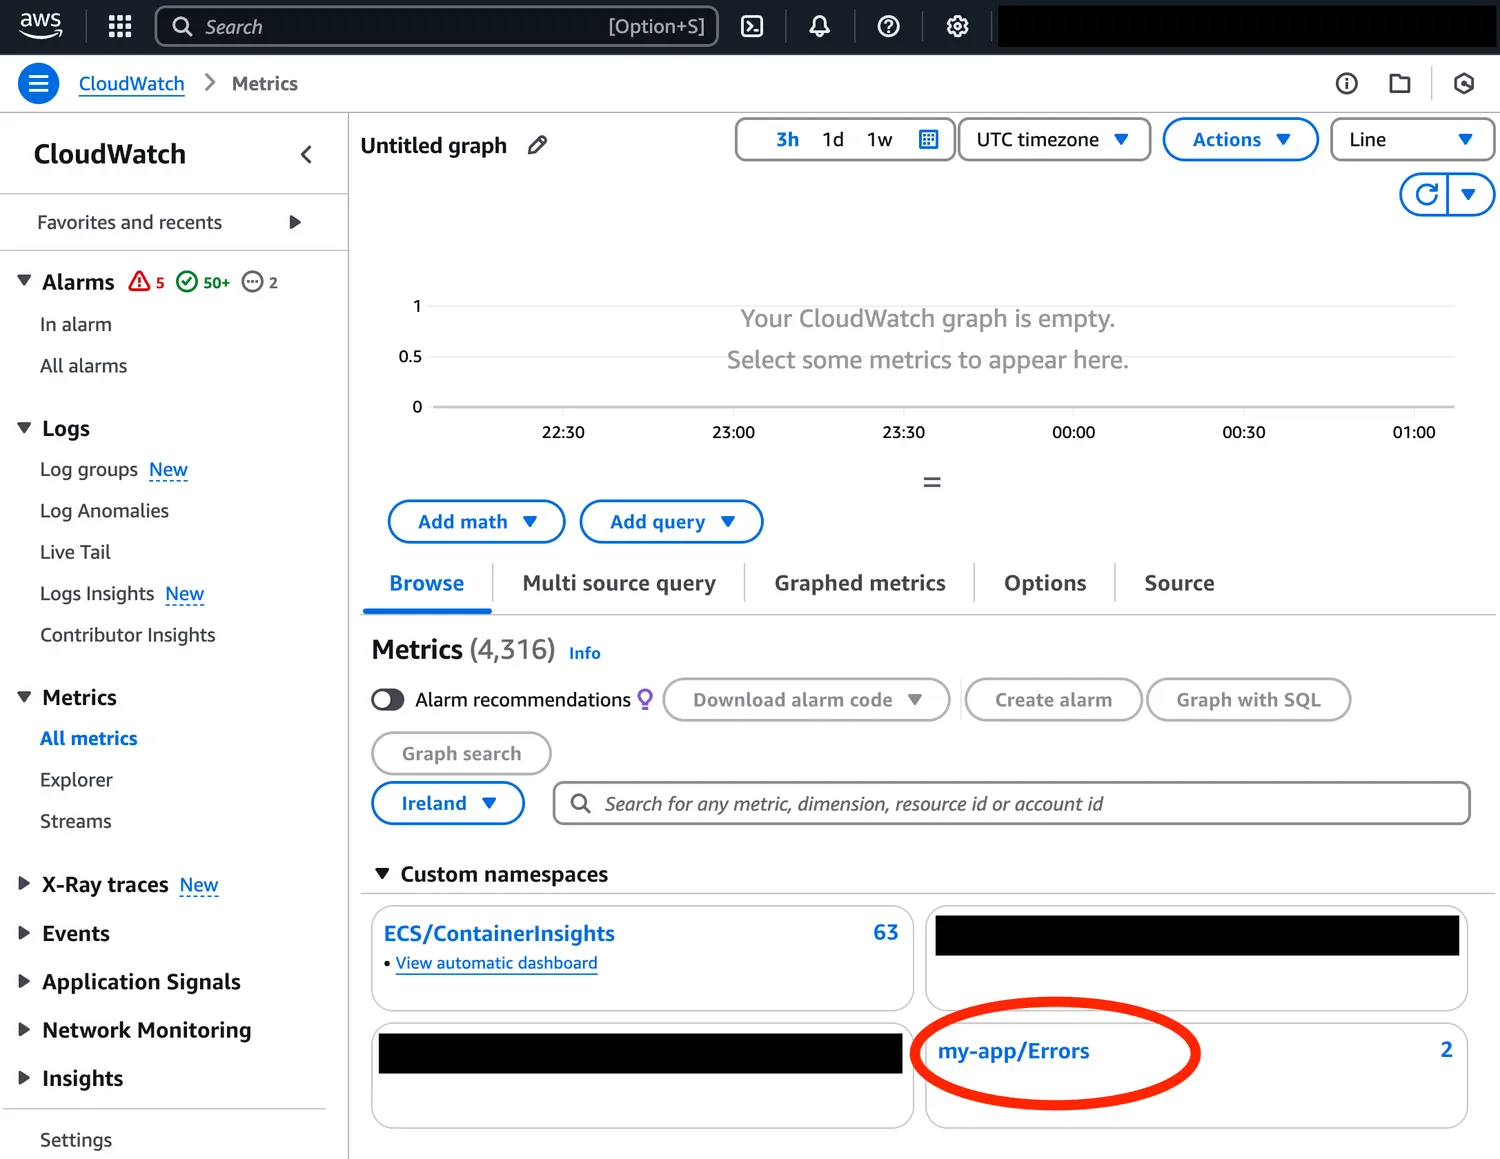
We now have a fully functional error logging service! Logs go to CloudWatch Logs and error counts are routed to CloudWatch Metrics.
Next up, we'll be taking on alarms to help monitor when errors come in! 💪
Keep reading in this series:
- Client-side telemetry: Series overview
- Client-side telemetry: Setting up a new CDK project
- Client-side telemetry: Deploying a Typescript Lambda function with CDK
- Client-side telemetry: Lambda permissions and APIs in CDK
- Client-side telemetry: Alarms